Shadowrocket user guide: from import to connection testing
This guide covers five steps for using Shadowrocket on iPhone and iPad: add existing server details, choose a routing mode, connect, verify the result, and troubleshoot issues. Interface locations may change; follow the labels shown in the app.
Add a server or import an existing subscription
First add your existing server details to the app, then choose how requests should be routed. Server details and a subscription URL are separate ways to add information; there is no need to add the same details twice.
Enter server details manually
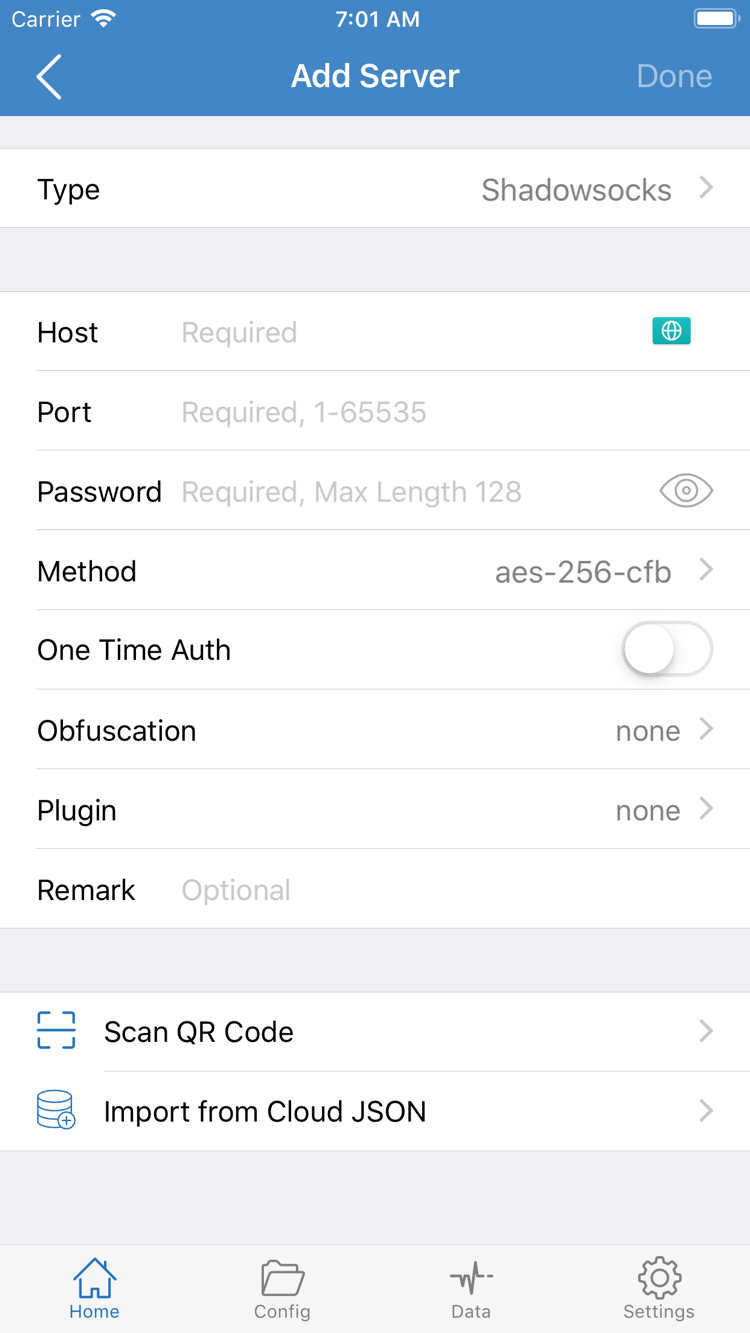
Open Home in Shadowrocket and find Add Server in the SERVER section. Check Type first; it determines which fields you need to enter. Choose the type that matches your server details, such as Shadowsocks, VMess, VLESS, Trojan, or WireGuard. Do not guess the Type based on the server name. Enter the Host and Port provided by your service provider, then fill in the Password, Method, or other fields required for that type. Fields vary by Type. The screenshot shows one example and does not mean every type requires Password and Method.
Check carefully when entering or pasting details: make sure Host has no extra spaces and Port matches the source. Preserve the capitalization and symbols in credentials. After saving, return to Home and confirm the new entry appears in the SERVER section. Tap it to select it as the current server. An entry in the list means the details were saved, not that a connection has been established. Next, choose a Global Routing mode and turn on the connection switch at the top of Home.
If you have a subscription URL
If you have a subscription URL from your own service provider, choose Subscribe from the add menu, paste the full URL into the subscription field, save it, and update it. When the update is complete, return to Home to check the imported entries and select a server to use. A subscription URL and a single-server share link serve different purposes: a subscription retrieves and updates a set of server details, while a share link usually represents one server entry. Do not repeatedly update a server share link as if it were a subscription URL. If you are unsure what kind of link you have, check the instructions from its source.
The bottom of the same screen may also show Scan QR Code and Import from Cloud JSON. These are separate import options for different types of information. If the expected entry does not appear after pasting a URL, check that it is complete, that your current network can reach its source, and that you have both saved and updated it. Do not create multiple copies before checking the result. For the differences between Subscribe, share links, and common protocol fields, see the glossary.
Choose a Global Routing mode
Decide which requests should use the current server before connecting. Otherwise, it is easy to confuse being connected with routing traffic as intended.
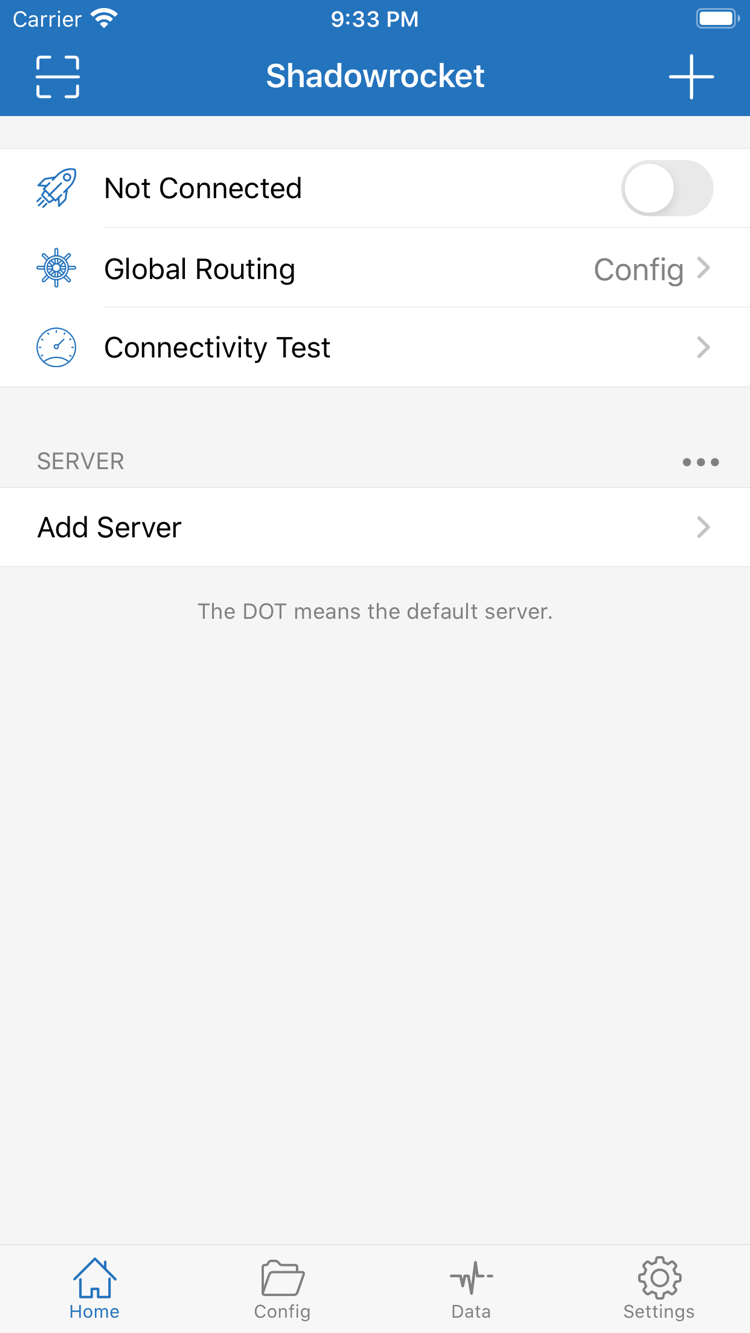
Return to Home and open Global Routing. The three commonly used modes are Config, Proxy, and Direct. With Config, the app evaluates requests against the rules in the current configuration file. With Proxy, requests are handled using the proxy mode. With Direct, requests are handled using the direct mode. These modes change how requests are handled; they do not correct a server address or credentials. After importing server details, choose the mode that fits your needs, then verify the result in the next steps.
If you choose Config, check where its rules come from. Open Config, find the active configuration file, and review the Rule section and the final rule. Rules are generally evaluated from top to bottom. For example, DOMAIN-SUFFIX,example.com,PROXY sends requests matching the example domain through PROXY; FINAL,DIRECT uses DIRECT when none of the preceding rules match. Here, example.com is only a syntax example, not a real destination to add. A PROXY rule alone does not mean all requests will use the proxy; requests that do not match it are handled according to FINAL.
The Config editor may also show sections such as General, Hosts, URL Rewrite, and HTTPS Decryption. You do not need to change these settings individually before your first connection. Avoid changing DNS, rewrites, and rules all at once just to test the connection. If you are using an existing configuration file, first confirm that the intended file is selected, then check whether Rule matches your needs. To create a rule, use Add Rule after you have defined the match conditions and policy. For explanations of DOMAIN-SUFFIX, GEOIP, FINAL, PROXY, DIRECT, and REJECT, see the rule glossary. For a systematic guide to reading configuration files, see the complete guide.
Checkpoint: Global Routing in Home shows the mode you just selected. If you chose Config, you have also checked the active configuration file and how it handles requests that do not match a rule. Now you can connect. This makes it easier to tell whether an unexpected test result is caused by a connection failure or by a rule sending the request along a different path.
DOMAIN-SUFFIX,example.com,PROXY
FINAL,DIRECT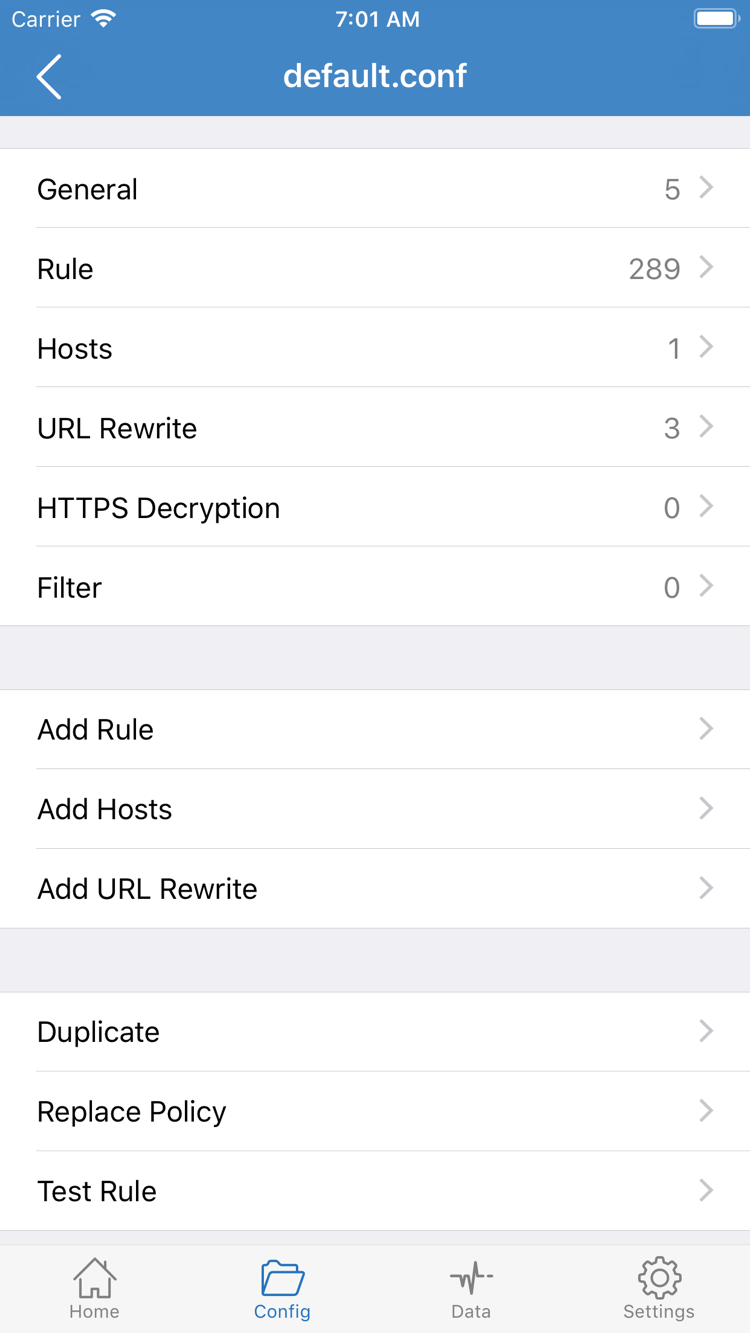
Turn on the connection from Home
Once the server is selected and Global Routing is set, use the switch at the top of Home.
Return to Home and confirm that the selected server in the SERVER section is the one you just checked. Make sure Global Routing shows the intended mode, then turn on the connection switch at the top of the screen. The first time you connect, the system may ask for permission to add a VPN configuration. Review the system prompt and follow its instructions; you may need to authenticate your device. This permission creates a network configuration on your device. It does not confirm that the server is available or replace the checks you have already made.
After granting permission, return to Home and check whether the status at the top changes from Not Connected to a connected state. If it still shows Not Connected, pause before changing settings at random. Check that the system permission process is complete, a server is selected, and the details have been saved. If the status changes briefly and then disconnects, note when it happens and troubleshoot it in the final step. Connectivity Test is near the connection controls in Home; use it in the next step to help verify the connection rather than relying on the switch alone.
On iPad, sections may appear in different positions depending on screen width, but the steps are the same: select a server in Home, check Global Routing, then connect. Use the English labels shown in the app rather than searching for buttons by their exact position in a screenshot. Check the App Store page for system requirements and device compatibility. If you have not confirmed your purchase or installation history, see the iPad access guide or the iPhone access guide.
Verify the result with Connectivity Test
Once the connection status is stable, return to Home and run Connectivity Test. Check whether the test returns a result, then compare it with what happens when you access the service. The test can help indicate whether the current connection is working, but a single test cannot tell you which rule matched a specific request. If you chose Proxy, check whether the destination works over the current connection. If you chose Direct, interpret the result in the context of direct routing. If you chose Config, review Rule and FINAL in the active configuration file to determine whether the request should use PROXY, DIRECT, or REJECT.
For each test, choose one specific destination and one Global Routing mode. If the same destination works in Proxy but behaves differently in Config, check the Config rules and their order before re-entering Host and Port. Conversely, if the connection cannot stay active in either mode, revisit the server details and permission steps. This comparison helps narrow down the issue and avoids losing track of what caused a change by adjusting several settings at once.
You can also open Data to review the traffic information recorded by the app and check whether requests were made during the test. Traffic figures reflect only activity within the recorded scope; on their own, they cannot prove that a particular site was handled by a specific policy. Consider them alongside the connection status, test result, and rules. If On Demand is enabled, the connection status may change according to its configured conditions when you switch networks. Note your current network and switch status before testing. For more detail on Data, rule matching, and diagnostics, see the complete guide.
The basic setup is complete if Home stays connected, Connectivity Test returns the expected result, and actual requests behave as intended for the selected mode. If any of these do not match, keep the current settings and work through the checks in the next section one at a time. An active connection switch, a test that returns a result, and correct routing for every request are not the same thing.
Troubleshoot common issues in order
Change one condition at a time, then reconnect and repeat the same test. This is the only way to tell which change affected the result.
First determine whether the connection failed or routing is unexpected
If Home continues to show Not Connected, check the connection switch, system permission to add a VPN configuration, and the current selection in the SERVER section. Then open that entry and compare its Type, Host, Port, and credentials with your existing server details. When entering details manually, a mismatched type or extra pasted characters can affect the result. If you used Subscribe, check that the URL is complete, the subscription updated successfully, and the intended entry is selected. The presence of a subscription name does not mean every server in it is connectable.
If Home shows a connected state but access does not behave as expected, check Global Routing first. In Config, review the active file, Rule match conditions, and FINAL. In Proxy or Direct, test the same destination according to the selected mode. Note that REJECT is a rule policy: requests that match it are rejected, which is different from a server failure. Before switching temporarily to another mode for comparison, note the original setting so you can restore it afterward.
Check diagnostic options in Settings
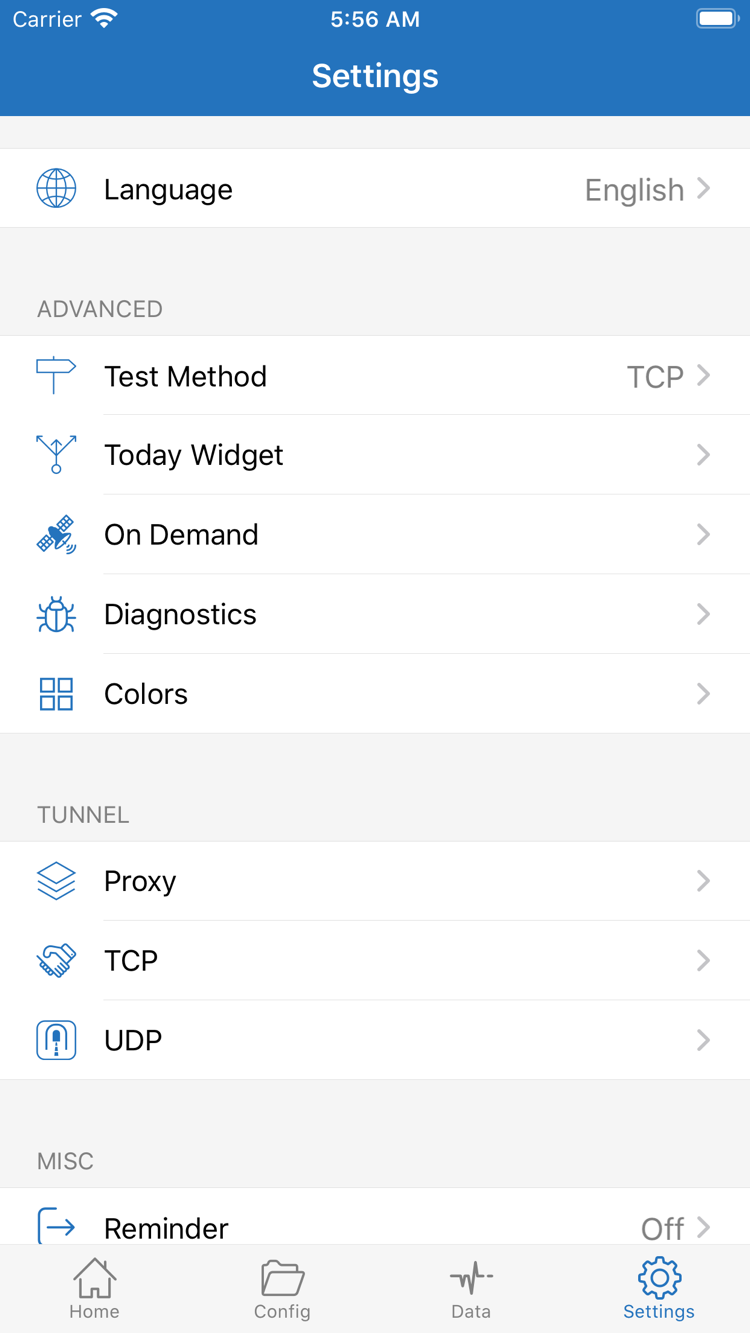
If the cause is still unclear, open Settings and review Test Method, On Demand, and Diagnostics. Test Method affects how you interpret test results. On Demand conditions may change the connection when the network changes. Diagnostics can provide additional clues. Note the current settings, adjust one item with a specific purpose, then return to Home and test again. Settings may also include Language, Today Widget, Proxy, TCP, and UDP; these are not a checklist of items to change before your first connection. Do not assume a setting caused the issue just because it is there.
If the issue occurs only after switching networks, note the Home status before and after the switch, then check the On Demand conditions. If it occurs only after a subscription update, compare the selected server and source details before and after the update. If Connectivity Test and actual access do not agree, record the test destination, Global Routing mode, active configuration file, and time, then see the connection and maintenance chapters in the complete guide. For Diagnostics, DNS, and rule fields, use the glossary.
Where to go next
This page covers the steps from using existing details through the first connection test. For a structured guide to Config, Data, Settings, and routine maintenance, read the complete Shadowrocket guide. To look up English interface labels, protocol names, or rule keywords, see the glossary. For app access, restoring purchases, and checking the store listing, see the App Store listing verification guide.